AWS Architecture and Setup
Architecture
Cloud ex Machina leverages a three-layer stack described on the below diagram:

Vocabulary and preliminary notions
The following definitions apply to the rest of this document:
- Management Account: the management account of an AWS Organization, sometimes also called Root Account, is the account where the structure of the organization is deployed. This is usually the first account that was created.
- Regions:
- us-east-1: when specified, this indicates that the component must be deployed in us-east-1 for technical reasons.
- Primary Region: the primary region is the region where global resources such as IAM Roles are deployed. It is usually the first region of each continent, ie. us-east-1 in the US, eu-west-1 in Europe and so on, but you may have selected a different one.
- Management Region: the management region refers to the region in which the AWS Organization is deployed. It may or may not be the same as your primary region.
- Components: Cloud ex Machina is organized around 4 main components that must be connected to your cloud.
- Organization Manager: tracks the hierarchy of the AWS Organization such as OUs, Accounts and their associated contacts if any.
- Cost & Usage Reports Crawler: tracks usage and cost of assets in the target cloud
- CloudTrail Crawler: tracks activity in the cloud that modifies assets
- Metadata Crawler: maintains an inventory of assets in the cloud and their correlations
Organization Manager
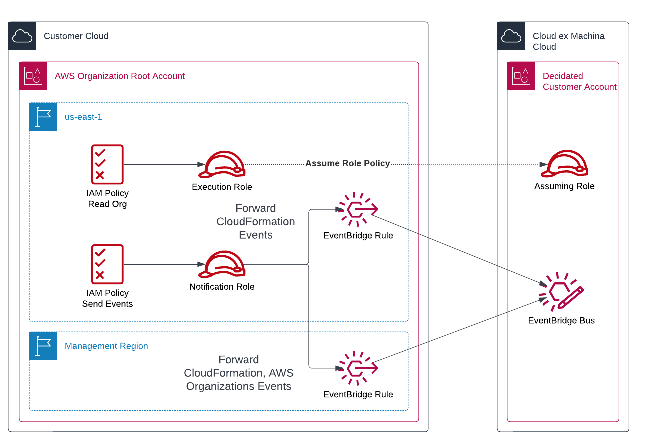
The Organization Manager has 2 main purposes:
- Getting a clear understanding of the structure of your cloud: Organization, OUs, Accounts, active services, service quotas (...)
- Managing Reservations and Savings Plans from a central account
The permissions required for this activity are:
| IAM Policy | Column 2 |
|---|---|
| AWSOrganizationsReadOnlyAccess | Lets CxM get a full understanding of your AWS Organization |
| ReadOnlyAccess | Used to make an inventory assets that may be optimized in the root account |
| ServiceQuotasFullAccess | Leverged to request changes in service quotas related to Savings Plans and RIs |
| AWSSavingsPlansFullAccess | Required to manage Savings Plans |
In addition to these standard AWS policies, the role requires the following specific policies:
- Reservation and Capacity Management:
- Sid: CommitmentManagementPermissions
  Effect: Allow
  Resource: "*"
  Action:
    # DynamoDB Reservations
    - dynamodb:DescribeReservedCapacity
    - dynamodb:DescribeReservedCapacityOfferings
    - dynamodb:PurchaseReservedCapacityOfferings
    # EC2 Reservations
    - ec2:DescribeReserved*
    - ec2:DescribeAvailabilityZones
    - ec2:DescribeAccountAttributes
    - ec2:DescribeRegions
    - ec2:DescribeInstances
    - ec2:DescribeInstanceTypes
    - ec2:DescribeTags
    - ec2:GetReserved*
    - ec2:ModifyReservedInstances
    - ec2:PurchaseReservedInstancesOffering
    - ec2:CreateReservedInstancesListing
    - ec2:CancelReservedInstancesListing
    - ec2:GetReservedInstancesExchangeQuote
    - ec2:AcceptReservedInstancesExchangeQuote
    # RDS Reservations
    - rds:DescribeReserved*
    - rds:ListTagsForResource*
    - rds:PurchaseReservedDBInstancesOffering
    # Redshift Reservations
    - redshift:DescribeReserved*
    - redshift:DescribeTags
    - redshift:GetReserved*
    - redshift:AcceptReservedNodeExchange
    - redshift:PurchaseReservedNodeOffering
    # ElastiCache Reservations
    - elasticache:DescribeReserved*
    - elasticache:ListTagsForResource
    - elasticache:PurchaseReservedCacheNodesOffering
    # ElasticSearch Reservations
    - es:DescribeReserved*
    - es:ListTags
    - es:PurchaseReservedElasticsearchInstanceOffering
    - es:PurchaseReservedInstanceOffering
    # memoryDB
    - memorydb:DescribeReserved*
    - memorydb:ListTags
    - memorydb:PurchaseReservedNodesOffering
    # Saving Plans full management
    - savingsplans:*
- Cost and Usage Report Management
- Sid: ManageReportDefinitions
  Effect: Allow
  Action:
    - cur:DescribeReportDefinitions
    - cur:ListTagsForResource
    - cur:ModifyReportDefinition
    - cur:PutReportDefinition
    - bcm-data-exports:List*
    - bcm-data-exports:Get*
    - bcm-data-exports:ListTagsForResource
    - ce:DescribeCostCategoryDefinition
    - ce:DescribeNotificationSubscription
    - ce:Describe*
    - ce:Get*
    - ce:List*
    - ec2:DescribeRegions
  Resource: "*"
- Sid: CostOptimizationHubReadOnlyAccess
  Effect: Allow
  Action:
    - cost-optimization-hub:ListEnrollmentStatuses
    - cost-optimization-hub:GetPreferences
    - cost-optimization-hub:GetRecommendation
    - cost-optimization-hub:ListRecommendations
    - cost-optimization-hub:ListRecommendationSummaries
  Resource: "*"
- User Discovery
- Sid: SSOReadOnlyAccess
  Effect: Allow
  Action:
    - sso-directory:Search*
    - sso-directory:Describe*
    - sso-directory:List*
    - sso-directory:Get*
    - sso:List*
    - sso:Get*
    - identitystore:Describe*
    - identitystore:List*
  Resource: "*"
- Member Account Metadata Crawler Jump Role
- Sid: AssumeRoleToMemberAccounts # can assume chain-role on all sub-accounts (if allowed by such role)
  Effect: Allow
  Action:
    - sts:AssumeRole
  Resource: !Sub "arn:aws:iam::*:role/${Prefix}*"
- Explicit denies: CxM cannot access any data of your own data. We only query the control plane of the cloud
- Sid: ExplicitDenyToDataPlane
  Effect: Deny
  Action:
    - athena:StartCalculationExecution
    - athena:StartQueryExecution
    - dynamodb:GetItem
    - dynamodb:BatchGetItem
    - dynamodb:Query
    - dynamodb:Scan
    - ec2:GetConsoleOutput
    - ec2:GetConsoleScreenshot
    - ecr:BatchGetImage
    - ecr:GetAuthorizationToken
    - ecr:GetDownloadUrlForLayer
    - ecs:RegisterTaskDefinition
    - kinesis:GetRecords
    - kinesis:GetShardIterator
    - lambda:GetFunction
    - logs:GetLogEvents
    - sdb:Select*
    - sqs:ReceiveMessage
    - rds-data:*
  Resource: "*"
In order for CxM to react to changes made to the organization as soon as they happen, some EventBridge Rules are also deployed to the root account that monitor CloudFormation and IAM changes made to our stacks.
Cost and Usage Reports (CUR) Crawler
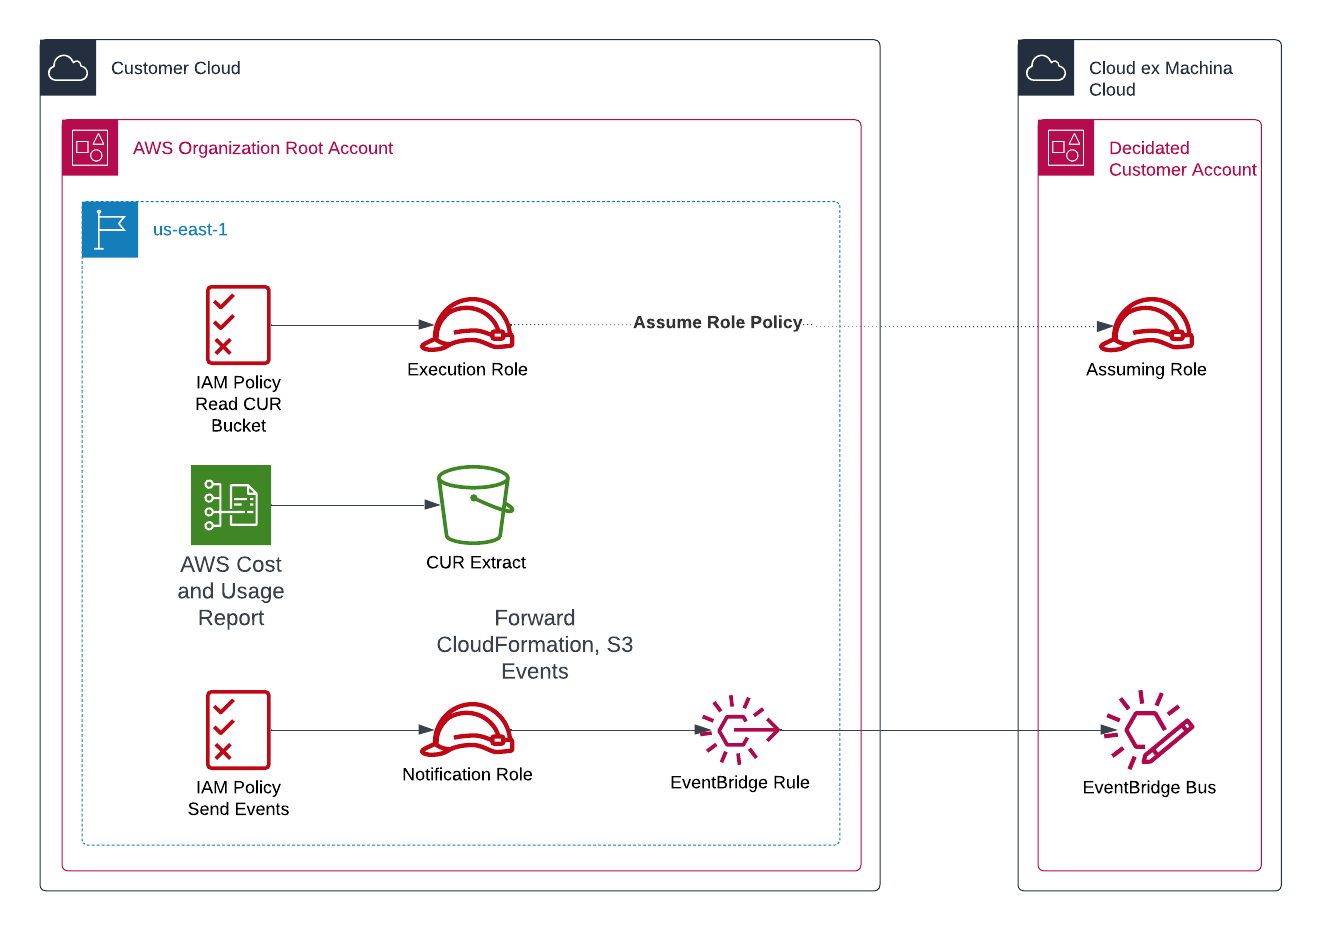
The CUR Crawler aims at getting an accurate understanding of your AWS bills.
It is installed in the payer account of each AWS Organization you have under management, and in us-east-1. It is also made of two sub-components:
- AWS IAM Role & Permissions: authorizes reading files in the bucket that contains CUR data
- EventBridge Rules: informs us of the delivery of new CUR files to the bucket so that we can integrate their content as soon as possible
The CUR Crawler is a mandatory component. If you do not have a CUR report in place in your environment, then you will need to create one.
Important: Cloud ex Machina requires a CUR report with the following attributes:
- format = "Parquet"
- compression = "Parquet"
- additional_schema_elements = ["RESOURCES"]
- time_unit = "HOURLY" (REQUIRED - daily or monthly CUR is not supported)
Why hourly? Hourly granularity is essential for accurate amortization of Reserved Instances and Savings Plans across usage hours, and for precise cost allocation.
If your existing CUR report does not match these requirements, Cloud ex Machina can assist you and recommend an implementation strategy.
The permissions required to read CUR data are:
  statement {
    sid       = "ListFilesInBUcket"
    actions   = ["s3:ListBucket"]
    resources = ["arn:aws:s3:::${var.s3_bucket_name}"]
  }

  statement {
    sid       = "ReadBucketFiles"
    actions   = ["s3:GetObject"]
    resources = ["arn:aws:s3:::${var.s3_bucket_name}/*"]
  }

  dynamic "statement" {
    for_each = var.s3_bucket_kms_key_arn != null ? [1] : []
    content {
      sid = "AccessKMSToDecryptData"
      actions = [
        "kms:Decrypt",
        "kms:GenerateDataKey"
      ]
      resources = [var.s3_bucket_kms_key_arn]
    }
  }
CloudTrail Crawler
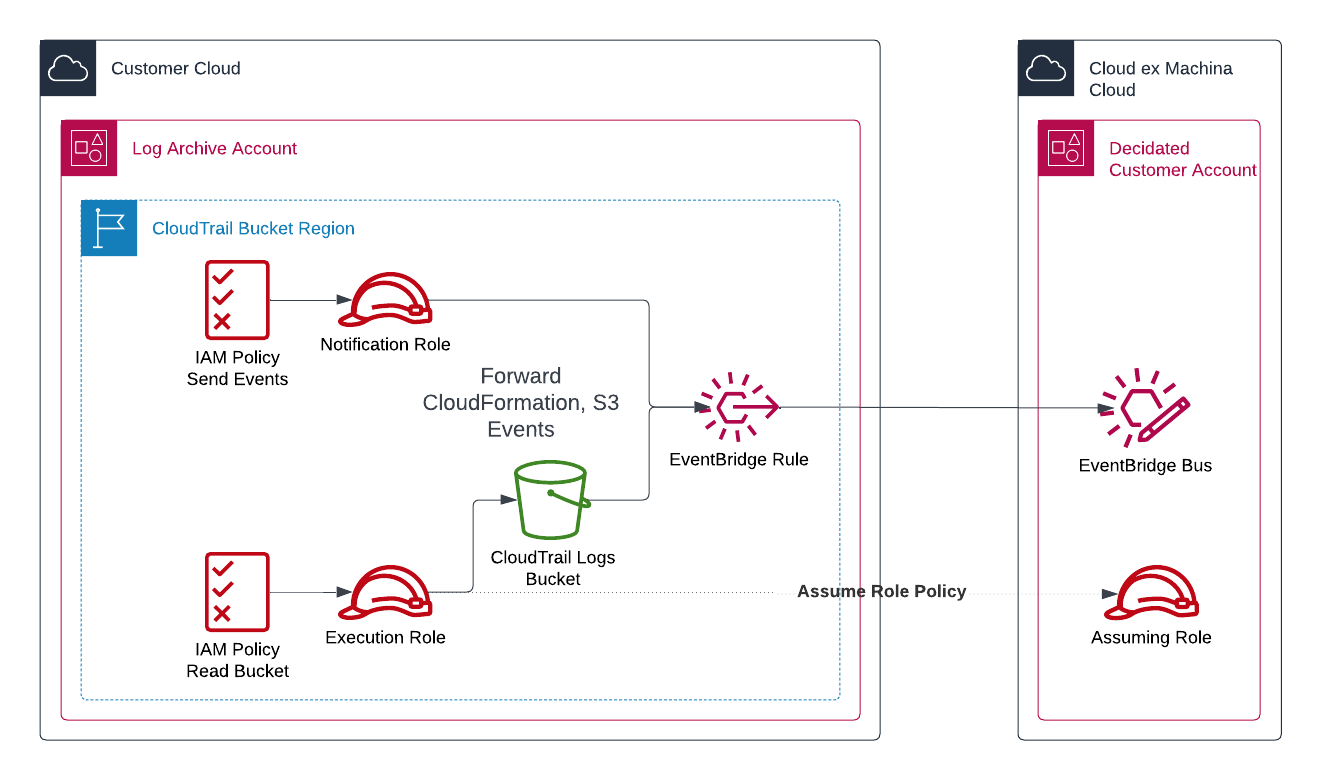
The Cloudtrail Crawler helps us understand historical and dynamic aspects of your cloud. It is an optional component that can be fully disabled.
It is installed in the same account and region as your aggregated CloudTrail Log Buckets. If you use Control Tower, the default account is called "Log Archive". If you own multiple organizations, you may have more than one CloudTrail Log Bucket.
- AWS IAM Role & Permissions: authorizes reading files in the bucket that contains CloudTrail logs
- EventBridge Rules: informs of the delivery of new files to the bucket so that we can integrate their content as soon as possible
The CloudTrail Crawler is a mandatory component. If you do not centralize CloudTrail logs yet, Cloud ex Machina recommends building this component first and can assist on a deployment strategy.
The permissions required to read CloudTrail Logs are:
  statement {
    sid       = "ListFilesInBUcket"
    actions   = ["s3:ListBucket"]
    resources = ["arn:aws:s3:::${var.s3_bucket_name}"]
  }

  statement {
    sid       = "ReadBucketFiles"
    actions   = ["s3:GetObject"]
    resources = ["arn:aws:s3:::${var.s3_bucket_name}/*"]
  }

  dynamic "statement" {
    for_each = var.s3_bucket_kms_key_arn != null ? [1] : []
    content {
      sid = "AccessKMSToDecryptData"
      actions = [
        "kms:Decrypt",
        "kms:GenerateDataKey"
      ]
      resources = [var.s3_bucket_kms_key_arn]
    }
  }
Metadata Crawler
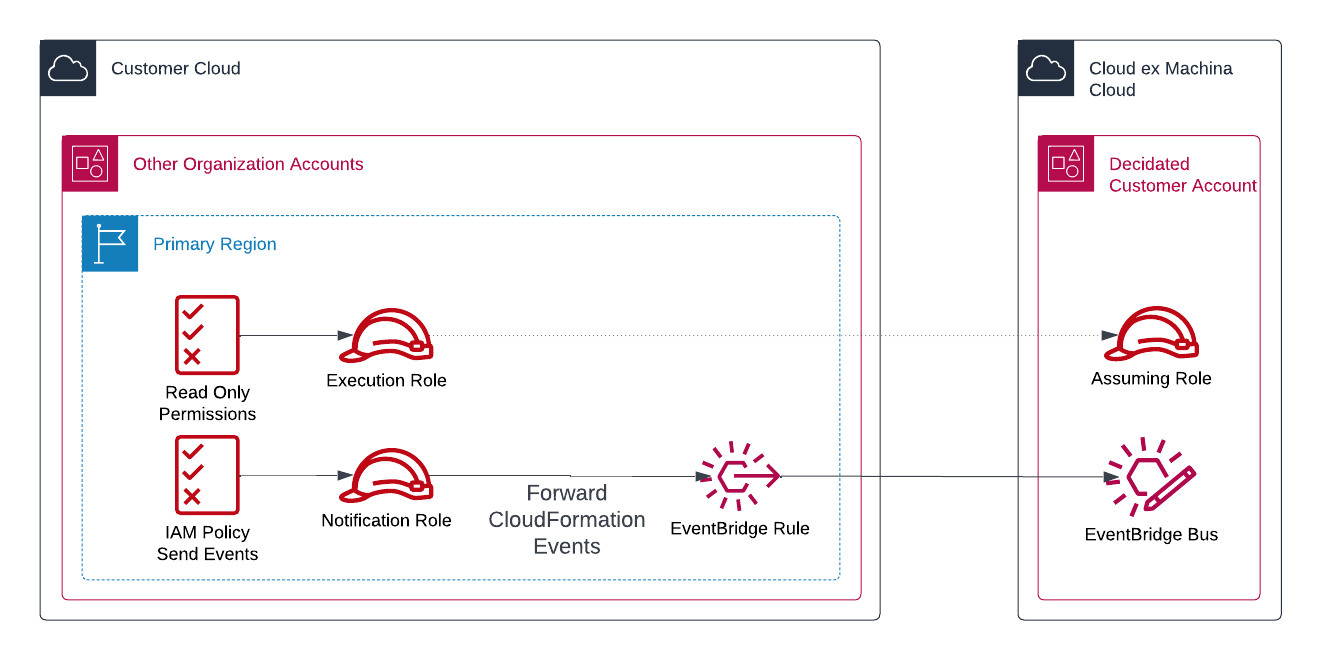
The Metadata Crawler is a mandatory component that helps qualify the performance of each and every asset that is currently running in your organization. It must be deployed in every account you have under management and your primary region.
It is deployed automatically via CloudFormation StackSets, or manually via the Terraform-native sub-account module if you prefer to avoid CloudFormation.
It contains a single component:
- AWS IAM Role & Permissions: authorizes calling any read only API in the account, as well as read any Terraform file available in any S3 bucket of the account
- EventBridge Rules: Feedback loop to check the availability of IAM roles to integrate the accounts as soon as technically possible
The permissions required for this activity are:
| IAM Policy | Column 2 |
|---|---|
| ReadOnlyAccess | Used to make an inventory assets that may be optimized in the root account |
| ServiceQuotasFullAccess | Leverged to request changes in service quotas related to Savings Plans and RIs |
| AWSSavingsPlansFullAccess | Required to manage Savings Plans |
In addition to these standard AWS policies, the role requires the following specific policies:
- Reservation and Capacity Management:
- Sid: CommitmentManagementPermissions
  Effect: Allow
  Resource: "*"
  Action:
    # DynamoDB Reservations
    - dynamodb:DescribeReservedCapacity
    - dynamodb:DescribeReservedCapacityOfferings
    - dynamodb:PurchaseReservedCapacityOfferings
    # EC2 Reservations
    - ec2:DescribeReserved*
    - ec2:DescribeAvailabilityZones
    - ec2:DescribeAccountAttributes
    - ec2:DescribeRegions
    - ec2:DescribeInstances
    - ec2:DescribeInstanceTypes
    - ec2:DescribeTags
    - ec2:GetReserved*
    - ec2:ModifyReservedInstances
    - ec2:PurchaseReservedInstancesOffering
    - ec2:CreateReservedInstancesListing
    - ec2:CancelReservedInstancesListing
    - ec2:GetReservedInstancesExchangeQuote
    - ec2:AcceptReservedInstancesExchangeQuote
    # RDS Reservations
    - rds:DescribeReserved*
    - rds:ListTagsForResource*
    - rds:PurchaseReservedDBInstancesOffering
    # Redshift Reservations
    - redshift:DescribeReserved*
    - redshift:DescribeTags
    - redshift:GetReserved*
    - redshift:AcceptReservedNodeExchange
    - redshift:PurchaseReservedNodeOffering
    # ElastiCache Reservations
    - elasticache:DescribeReserved*
    - elasticache:ListTagsForResource
    - elasticache:PurchaseReservedCacheNodesOffering
    # ElasticSearch Reservations
    - es:DescribeReserved*
    - es:ListTags
    - es:PurchaseReservedElasticsearchInstanceOffering
    - es:PurchaseReservedInstanceOffering
    # memoryDB
    - memorydb:DescribeReserved*
    - memorydb:ListTags
    - memorydb:PurchaseReservedNodesOffering
    # Saving Plans full management
    - savingsplans:*
- Explicit denies: CxM cannot access any data of your own data. We only query the control plane of the cloud
- Sid: ExplicitDenyToDataPlane
  Effect: Deny
  Action:
    - athena:StartCalculationExecution
    - athena:StartQueryExecution
    - dynamodb:GetItem
    - dynamodb:BatchGetItem
    - dynamodb:Query
    - dynamodb:Scan
    - ec2:GetConsoleOutput
    - ec2:GetConsoleScreenshot
    - ecr:BatchGetImage
    - ecr:GetAuthorizationToken
    - ecr:GetDownloadUrlForLayer
    - ecs:RegisterTaskDefinition
    - kinesis:GetRecords
    - kinesis:GetShardIterator
    - lambda:GetFunction
    - logs:GetLogEvents
    - sdb:Select*
    - sqs:ReceiveMessage
    - rds-data:*
  Resource: "*"
Scheduling & Scaling (Optional)
Cloud ex Machina can schedule and scale your AWS resources to reduce costs during off-peak hours. This is an opt-in feature that grants additional write permissions to stop, start, and scale workloads.
When enabled (via enable_scheduling = true in Terraform, or EnableScheduling = true in CloudFormation), the following permissions are added to the Metadata Crawler role in each member account:
- Sid: SchedulingPermissions
  Effect: Allow
  Resource: "*"
  Action:
    # ECS Scaling
    - ecs:UpdateService
    # EC2 Stop/Start
    - ec2:StartInstances
    - ec2:StopInstances
    # RDS Stop/Start
    - rds:StartDBInstance
    - rds:StopDBInstance
    - rds:StartDBCluster
    - rds:StopDBCluster
    # Lambda Concurrency
    - lambda:PutProvisionedConcurrencyConfig
    - lambda:DeleteProvisionedConcurrencyConfig
    - lambda:PutFunctionConcurrency
    - lambda:DeleteFunctionConcurrency
    # EKS Nodegroup Scaling
    - eks:UpdateNodegroupConfig
    # Auto Scaling Groups
    - autoscaling:UpdateAutoScalingGroup
    - autoscaling:SetDesiredCapacity
    # Application Auto Scaling
    - application-autoscaling:RegisterScalableTarget
    # ElastiCache Scaling
    - elasticache:ModifyReplicationGroup
    - elasticache:ModifyCacheCluster
    # Redshift Scaling
    - redshift:PauseCluster
    - redshift:ResumeCluster
    - redshift:ResizeCluster
    # SageMaker Scaling
    - sagemaker:UpdateEndpointWeightsAndCapacities
Note: These permissions are deployed as a separate IAM policy, independent of the read-only and commitment management policies. They can be enabled or disabled without affecting other CXM functionality. All data-plane deny statements remain in effect regardless of whether scheduling is enabled.
Setup
Pre-requisites
Required Software
You will need the following dependencies to initialize Cloud ex Machina:
- Terraform: Install any version above 1.5.0. If you migrated to OpenTofu, this is also supported.
- jq: Install any recent version
- AWS CLI: Install any version >2.0
AWS Organizations Settings
Before you start, check that your organization supports the deployment of CloudFormation StackSets
- AWS Web Console
- AWS CLI
In your Management Account, browse to AWS Organizations, then open the Services menu, and navigate until the CloudFormation StackSets entry. It must be enabled (see image below)

Enable it if it is not already enabled.
While logged in as an administrator of the AWS Organization, run the following command. The output must not be empty.
aws organizations list-aws-service-access-for-organization | jq '.EnabledServicePrincipals[] | select( .ServicePrincipal == "member.org.stacksets.cloudformation.amazonaws.com" )'
{
  "ServicePrincipal": "member.org.stacksets.cloudformation.amazonaws.com",
  "DateEnabled": "2023-10-31T15:58:57.956000+01:00"
}
If the service isn't enabled, run the following command:
aws organizations enable-aws-service-access --service-principal "member.org.stacksets.cloudformation.amazonaws.com"
If you prefer to avoid CloudFormation entirely, you can deploy member account roles using pure Terraform instead of StackSets. See Terraform-Native Sub-Account Deployment below.
Deployment Configuration
make sure to collect the following information:
- From Cloud ex Machina:
- cxm_aws_account_id: This is the ID of the AWS Account that is fully dedicated to you
- cxm_external_id: This is the External ID that will be used to secure the API calls passed by Cloud ex Machina
- From your AWS Environment:
- deployment_targets: the list of Organizational Units where you want to deploy the solution. You can use either the Root Organization (with a format
r-ab12) or a list of children OUs from the root. The entire subtree of each of these child OUs will be deployed. - cloudtrail_bucket_name: Name of the bucket used to centralize your CloudTrail logs - required only if you desire to enable the CloudTrail crawler
- cur_bucket_name: Name of the bucket where Cost & Usage reports (CUR) are stored
- deployment_targets: the list of Organizational Units where you want to deploy the solution. You can use either the Root Organization (with a format
In addition, assemble credentials to configure Terraform providers for your AWS Management Account and your Log Archive Account that can deploy IAM Roles and CloudFormation StackSets.
Configure Terraform / OpenTofu
Prepare a new Terraform configuration file main.tf that contains the following sections :
State Backend
Configure this the way you usually do it.
Providers
Providers should be setup based on where you store your CUR bucket and your cloudtrail logs bucket.
# Provider for the AWS Organization Management Account in us-east-1
# Required to deploy the CUR Crawler
provider "aws" {
  region  = "us-east-1"
  profile = "org-root"
  alias   = "root-us-east-1"
}

# Provider for the AWS Organization Billing Account in the same region as the
# Cost & Usage Report (CUR) bucket
provider "aws" {
  region  = "eu-west-1"
  profile = "org-cur"
  alias   = "cur"
}

# Provider for the AWS Organization Log Archive Account in the same region as the
# Log Archive Bucket
provider "aws" {
  region  = "us-east-2"
  profile = "org-log-archive"
  alias   = "cloudtrail"
}
Note : if you do not use AWS Organization, and use a simple AWS account, then refer to Lone Account config below.
Module Configuration
module "cxm-integration" {
  source  = "cxmlabs/cxm-integration/aws"

  providers = {
    aws.root       = aws.root-us-east-1
    aws.cur        = aws.cur
    aws.cloudtrail = aws.cloudtrail
  }

  cxm_external_id    = "ExternalID Provided by Cloud ex Machina"
  cxm_aws_account_id = "123456789123 (provided by Cloud ex Machina)"

  cost_usage_report_bucket_name = "stackset-customcontroltower-cur-report-f-s3bucket-o8nhba42il14"
  cloudtrail_bucket_name        = "aws-controltower-logs-012345678909-us-east-2"

  # Optional: enable scheduling and scaling for FinOps cost optimization
  # enable_scheduling = true

  tags = {
    "MyTag" : "MyTagValue"
  }
}
Module Configuration for a Lone Account
If your AWS account is not using AWS Organization, and you have a single "lone" AWS account,
then you could skip the different AWS provider config with multiple profiles
and use the use_lone_account_instead_of_aws_organization = true flag :
provider "aws" {
  region  = "us-east-1"
  profile = "my-company-account"
}

module "cxm-integration" {
  source  = "cxmlabs/cxm-integration/aws"

  providers = {
    aws.root       = aws
    aws.cur        = aws
    aws.cloudtrail = aws
  }

  use_lone_account_instead_of_aws_organization = true  # set this to true if you do not use AWS Organization

  cxm_external_id    = "ExternalID Provided by Cloud ex Machina"
  cxm_aws_account_id = "123456789123 (provided by Cloud ex Machina)"

  cost_usage_report_bucket_name = "cur-s3bucket-o8nhba42il14"
  cloudtrail_bucket_name        = "cloudtrail-logs-012345678909"

  tags = {
    "MyTag" : "MyTagValue"
  }
}
Terraform-Native Sub-Account Deployment
By default, Cloud ex Machina deploys asset-crawler roles to member accounts via CloudFormation StackSets. If you prefer pure Terraform (no CloudFormation), you can use the standalone sub-account module instead.
Step 1: Disable the StackSet in your root module:
module "cxm-integration" {
  source  = "cxmlabs/cxm-integration/aws"

  # ... your existing configuration ...

  disable_stackset_deployment = true  # Use Terraform-native sub-account modules instead
}
Step 2: Configure a provider per sub-account, then pass it to the module:
provider "aws" {
  alias  = "engineering"
  region = "us-east-1"
  assume_role {
    role_arn = "arn:aws:iam::111111111111:role/OrganizationAccountAccessRole"
  }
}

provider "aws" {
  alias  = "production"
  region = "us-east-1"
  assume_role {
    role_arn = "arn:aws:iam::222222222222:role/AWSControlTowerExecution"
  }
}

module "cxm_sub_account_engineering" {
  source  = "cxmlabs/cxm-integration/aws//terraform-aws-sub-account-cxm-enablement"

  providers = { aws = aws.engineering }

  cxm_aws_account_id = "123456789123 (provided by Cloud ex Machina)"
  cxm_external_id    = "ExternalID Provided by Cloud ex Machina"
  cxm_admin_role_arn = module.cxm-integration.organization_iam_role_arn

  tags = { "MyTag" : "MyTagValue" }
}

module "cxm_sub_account_production" {
  source  = "cxmlabs/cxm-integration/aws//terraform-aws-sub-account-cxm-enablement"

  providers = { aws = aws.production }

  cxm_aws_account_id = "123456789123 (provided by Cloud ex Machina)"
  cxm_external_id    = "ExternalID Provided by Cloud ex Machina"
  cxm_admin_role_arn = module.cxm-integration.organization_iam_role_arn

  tags = { "MyTag" : "MyTagValue" }
}
You configure the provider with whatever auth method you use (assume_role, SSO profile, etc.) — the module doesn't manage authentication. The provider is only used during terraform apply — it is not the role used by Cloud ex Machina at runtime.
You can discover your member account IDs via:
terraform output discovered_account_ids
# or
aws organizations list-accounts --query 'Accounts[?Status==`ACTIVE`].[Id,Name]' --output table
Standard Terraform cannot dynamically create providers, so one module block per account is required. OpenTofu 1.9+ users can use for_each to reduce boilerplate. See the module documentation for OpenTofu and Terragrunt tips.
Deploy
Run
terraform init
terraform plan
terraform apply
and wait for the system to converge. Depending on the size of your estate, this can take from a few minutes to a few tens of minutes.